Understanding Your Oral-B Toothbrush Model
Diving into the Variants of Oral-B Toothbrush Models
Understanding the different models of Oral-B electric toothbrushes is crucial before diving into any maintenance task, such as a battery replacement. These toothbrushes vary significantly in terms of design, features, and battery type, which can impact how you approach both battery life and replacement procedures.
Oral-B, as a renowned brand, offers a range of electric toothbrushes from basic models to high-end professional care types. Each model, whether it be part of the Oral Professional series or a simpler Oral toothbrush, may come equipped with either a nickel-metal hydride or a type of lithium battery. Knowing your model's battery type is key for a safe and successful removal process.
Navigating Charging and Base Components
Collecting information about the way your Oral-B toothbrush charges can make or break the task of battery replacement. The charging coil typically located at the base of the toothbrush handle works in tandem with a charger to replenish the battery. If the charging light fails to illuminate, further analysis might be required before extracting the batteries.
Considering the charger, handle, and base structure will also help you better identify the tools needed for a smooth removal, repairs, or when exploring repair guides online for deeper technical insights.
Tools You Will Need
Essential Tools for Safe Battery Replacement
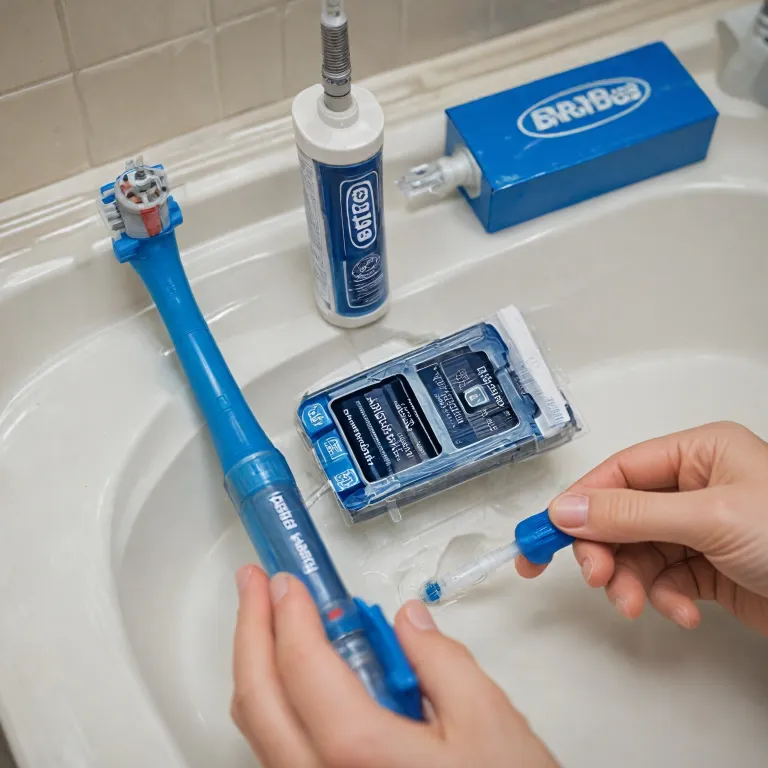
Embarking on the task of removing and replacing the battery from your Oral-B electric toothbrush requires a few essential tools. Before diving into the task, ensure you have the proper equipment to complete the task seamlessly and effectively. Here's what you'll need:
- Screwdriver: Most Braun Oral toothbrush models have screws securing the handle. Having the right screwdriver type will ease disassembling. Philips screwdrivers are typically used.
- Pliers: These will help you handle small components and wires inside the handle once you open the toothbrush.
- Soldering Iron & Solder: To detach and attach battery connections, a standard soldering iron will be necessary, especially for nickel-metal hydride or lithium batteries.
- Replacement Battery: Make sure the replacement battery type matches your toothbrush. Check your model’s specifications.
- Heat Shrink Tubing: This is optional but recommended for safe insulation of wires after soldering.
- Safety Glasses: Protection is paramount, especially when working with electric tools or soldering devices.
Having these tools ready not only ensures a smooth operation but also reduces the risk of damaging your toothbrush’s components during the battery removal process. Remember, maintaining the integrity of your device can expand the longevity of your best oral companion.
For a more detailed guide on handling electric toothbrush battery replacements and ensuring every step is carefully executed, you can explore this comprehensive guide tailored to battery management and technical safety.
Step-by-Step Battery Removal Process
How to Carefully Dismantle the Handle for Battery Replacement
Replacing the battery in your Oral-B toothbrush is a task that requires precision and patience. Understanding the nuances of your model is crucial, as it sets the stage for the removal process. Here's how you can proceed with dismantling the toothbrush handle to access the battery safely.- Detach the Brush Head:
- Separate the Base:
- Open the Handle:
- Locate and Remove the Battery:
- Prepare for Replacement:
Safety Precautions to Consider
Safety Measures for Battery Removal
When undertaking the process of removing the battery from your Oral-B toothbrush, it is crucial to prioritize safety above all else. Here are some essential precautions to keep in mind:- Unplug the Charger: Before you start, ensure that your toothbrush is completely disconnected from its charger or charging base. This will prevent any accidental current flow while you’re working.
- Protective Gear: Wear safety glasses and gloves to shield your eyes and hands from potential hazards, especially because you will be handling metal components and possibly using a soldering iron.
- Avoid Damaging the Toothbrush Handle: When removing the battery, handle your brush with care to prevent damaging the components or connections within the electric toothbrush handle, which might affect the device’s functionality.
- Aware of the Battery Type: Knowing whether your toothbrush uses nickel-metal hydride or another type of battery is vital. Different battery types can have specific disposal and handling requirements.
- Mindful of Soldering: If your toothbrush model requires unsoldering connections to access the battery, ensure you are cautious when using a soldering iron. Solder and de-solder joints carefully to avoid short circuits.
Disposing of the Battery Responsibly
Responsible Disposal of Used Batteries
Disposing of the batteries from your Oral-B toothbrush correctly is crucial not only for ensuring personal and environmental safety but also for abiding by local regulations. Here’s how you can responsibly discard the used battery:- Identify the Type: Determine the type of battery you've removed, as Oral-B toothbrushes commonly use nickel metal hydride (NiMH) batteries or other variants. Each type may have specific disposal guidelines.
- Recycle Where Possible: Many local waste management facilities offer designated recycling programs for batteries. Look for a local recycling center that accepts electronic waste or batteries, which benefits the ecosystem by minimizing potential pollution.
- Use Specialized Disposal Services: Some retailers and electronics stores offer battery disposal services. Contact them to confirm if they accept oral toothbrush batteries and ensure you're compliant with their processes.
- Avoid Regular Trash Bins: Never dispose of the toothbrush battery in regular garbage bins, as improper disposal could lead to leakage, environmental harm, or safety hazards.
Troubleshooting Common Issues
Troubleshooting Tips for Battery Replacement Issues
Even with careful handling during the battery removal process, you might encounter some common issues. Here are a few troubleshooting tips to ease your way through these challenges:- Battery Won't Hold Charge: After replacing the battery, if your electric toothbrush seems to not hold a charge, ensure that the battery and the replacement battery type are compatible with your Oral-B toothbrush model. Double-check that the metal contacts on the battery and inside the toothbrush handle are clean and free of corrosion.
- Charging Light Doesn't Turn On: If the charging light on your Braun Oral toothbrush won't turn on, first confirm that the toothbrush is properly placed on the charger base. The charging coil should align with the base. Additionally, verify that the charger base is plugged in and functioning.
- Soldering Mistakes: In case soldering was required during the battery replacement, ensure that all connections were made correctly. A faulty soldering connection could lead to power issues. Using a quality soldering iron will help in achieving a strong connection.
- Toothbrush Vibrates Weakly: This might result from insufficient contact between the battery and the brush handle contacts. Open the handle to check for and correct any misalignment.
- Privacy Policy Concerns: If your toothbrush has advanced smart features, double-check your device settings for any potential interferences with its operation.